


PROTON SAGA BLM, FL, FLX CLUB V17, Saga FLX SE 1.6 -> PRESSURE YOUR PEERS
PROTON SAGA BLM, FL, FLX CLUB V17, Saga FLX SE 1.6 -> PRESSURE YOUR PEERS
|
|
 Nov 24 2011, 12:46 PM Nov 24 2011, 12:46 PM
Return to original view | Post
#1
|
 
Senior Member
2,141 posts Joined: Sep 2008 From: Muddy Banks |
eh, toyol sudah bukak thread baru
|
|
|
|
|
|
Nov 24 2011, 09:52 PM
Return to original view | Post
#2
|
|
Senior Member
2,141 posts Joined: Sep 2008 From: Muddy Banks |
traffic jam still will jerk... babi betul X_X
|
|
|
Nov 24 2011, 10:01 PM
Return to original view | Post
#3
|
|
Senior Member
2,141 posts Joined: Sep 2008 From: Muddy Banks |
Mine is even better
 |
|
|
Nov 24 2011, 10:18 PM
Return to original view | Post
#4
|
|
Senior Member
2,141 posts Joined: Sep 2008 From: Muddy Banks |
QUOTE(gogoman86 @ Nov 24 2011, 10:09 PM)  for any FLX user who haven't send for recall, can you confirm this (left) black copper pipe is existing or not?  coz, my headlamps sticker is connected to my bumper. If this is installed during my service last week, the sticker should be torn off/damaged since the whole bumper needs to be taken off in order to facilitate the installation of that black piping, but its not. Take a look under your hood, on the CVT box, they should write a "P" on it and also there's some hose with a semi translucent cap on the end attached to it. Then the second recall part is actually the fuel hose which feeds fuel into the engine from the fuel pump. It has nothing to do with the CVT box since this recall affects all FLX regardless of transmission. |
|
|
Nov 24 2011, 10:21 PM
Return to original view | Post
#5
|
|
Senior Member
2,141 posts Joined: Sep 2008 From: Muddy Banks |
Speaking of which, itu budak Kalimdor sudah lama sesat kat Kalimdor. Dint come here edi.
|
|
|
Nov 24 2011, 11:13 PM
Return to original view | Post
#6
|
|
Senior Member
2,141 posts Joined: Sep 2008 From: Muddy Banks |
QUOTE(Seizai Feng @ Nov 24 2011, 11:04 PM) some problem regarding the ABL on flx. i found out the car will immediately lock once the front passenger side door open (if consistently step on the brake). tried on other door but it only will close once u shut the door. check with the ABL installer since stock car doesn't comes with ABL from the factory, only Central Locking.so is the car prob or the ABL prob? |
|
|
|
|
|
Nov 25 2011, 10:57 AM
Return to original view | Post
#7
|
|
Senior Member
2,141 posts Joined: Sep 2008 From: Muddy Banks |
QUOTE(flipmode @ Nov 25 2011, 09:12 AM) whta do you guys mean by 1st batch of flx cvt owner? got 2nd batch already r? do i need to go to sc to "upgrade" the cvt gearbox since my car only 7 days old (otr la.. 1st batch is those built and sold between August - October. Those who got their cars before Proton order a temporary stop work order on new FLX deliveries.) |
|
|
Nov 25 2011, 10:25 PM
Return to original view | Post
#8
|
|
Senior Member
2,141 posts Joined: Sep 2008 From: Muddy Banks |
RM30 160km
Added on November 25, 2011, 10:26 pmheavy footer here This post has been edited by V12Kompressor: Nov 25 2011, 10:26 PM |
|
|
Nov 25 2011, 11:52 PM
Return to original view | Post
#9
|
|
Senior Member
2,141 posts Joined: Sep 2008 From: Muddy Banks |
@plain_white Saga BLM or FL/FLX?
If FL/FLX, it gonna cost RM 450++ |
|
|
Nov 26 2011, 12:01 AM
Return to original view | Post
#10
|
|
Senior Member
2,141 posts Joined: Sep 2008 From: Muddy Banks |
oic, in this case;
go mudah search for Persona Elegance side mirror and change at SC and pay them some labour charge. only downside is, the color isn't matching if your FLX is blue or elegant brown. Added on November 26, 2011, 12:01 ambut yours is black, so not a problem This post has been edited by V12Kompressor: Nov 26 2011, 12:01 AM |
|
|
Nov 26 2011, 08:46 PM
Return to original view | Post
#11
|
|
Senior Member
2,141 posts Joined: Sep 2008 From: Muddy Banks |
QUOTE(ericmaxman @ Nov 26 2011, 08:42 PM)  if no more warranty how? >< |
|
|
Nov 27 2011, 07:51 PM
Return to original view | Post
#12
|
|
Senior Member
2,141 posts Joined: Sep 2008 From: Muddy Banks |
QUOTE(n0thing @ Nov 27 2011, 07:44 PM) why is my 1.3 FL sucking petrol like nobody's business?? you're expecting 500km kah?rm60@rm1.90 barely gets me 350km |
|
|
Nov 27 2011, 10:47 PM
Return to original view | Post
#13
|
|
Senior Member
2,141 posts Joined: Sep 2008 From: Muddy Banks |
A quote from Civic Club TS;
QUOTE(mADmAN @ Nov 23 2011, 09:02 PM) coz last time there were alot of performance enthusiasts posting up about mods etc... nowadays the only enthusiasts left are FC enthusiasts... boring  |
|
|
|
|
|
Nov 27 2011, 11:15 PM
Return to original view | Post
#14
|
|
Senior Member
2,141 posts Joined: Sep 2008 From: Muddy Banks |
not necessary need to wait for waterproof DRL to come out
Sendiri DIY pun boleh make it waterproof. how hard can it be. |
|
|
Nov 27 2011, 11:26 PM
Return to original view | Post
#15
|
|
Senior Member
2,141 posts Joined: Sep 2008 From: Muddy Banks |
QUOTE(Sh@rty 5 @ Nov 27 2011, 11:18 PM) at least i dun have to keep on changing for my customer how many month(s) does it takes for your customer comes back to you for a replacement? |
|
|
Nov 27 2011, 11:42 PM
Return to original view | Post
#16
|
|
Senior Member
2,141 posts Joined: Sep 2008 From: Muddy Banks |
QUOTE(Sh@rty 5 @ Nov 27 2011, 11:34 PM)  pure luck bro pure luck brosome 2 weeks some 3 months oklah, give you free tips la unscrew the DRL and pakai silicon apply at the edges, including the screw and wire hole(s). when apply silicone make sure dont have air pockets or else, it will defeat the purpose. |
|
|
Nov 27 2011, 11:46 PM
Return to original view | Post
#17
|
|
Senior Member
2,141 posts Joined: Sep 2008 From: Muddy Banks |
yes. not once, not twice, not thrice
but actually, I've done 4 sets including F1 braking lamps. |
|
|
Nov 27 2011, 11:54 PM
Return to original view | Post
#18
|
|
Senior Member
2,141 posts Joined: Sep 2008 From: Muddy Banks |
QUOTE(Sh@rty 5 @ Nov 27 2011, 11:47 PM)  i remember seeing a post here someone took their 3rd brake lamp to get it done i remember seeing a post here someone took their 3rd brake lamp to get it done  how much u wanna charge for drl since u can kaw tim how much u wanna charge for drl since u can kaw tim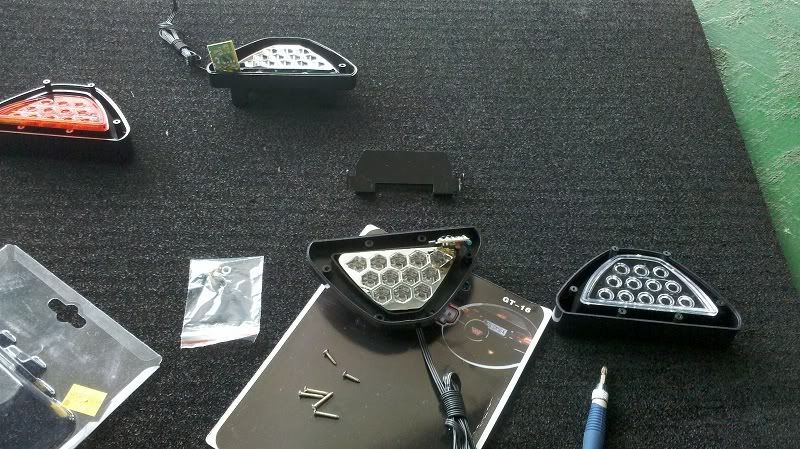 DRL also same concept, unscrew, split open, apply silicone on edges, clip back, screw, apply silicone in screw hole and wire hole. Let it dry then trim off excess silicone round the edges. This post has been edited by V12Kompressor: Nov 27 2011, 11:55 PM |
|
|
Nov 28 2011, 12:05 AM
Return to original view | Post
#19
|
|
Senior Member
2,141 posts Joined: Sep 2008 From: Muddy Banks |
QUOTE(SiuYi @ Nov 27 2011, 11:58 PM) V12Kompressor Depending on quality lo, cheap ones confirm need to do it since it will last 2weeks - 2 months before water seeping in. from ur pov, all after market lighting effect accessories need such touchup? After doing this, water will not easily seep in and hence its only up to the longevity of LEDs to determine when to change to a new sets of light. This, I learn from BLM club otai one. |
|
|
Nov 28 2011, 12:06 AM
Return to original view | Post
#20
|
|
Senior Member
2,141 posts Joined: Sep 2008 From: Muddy Banks |
QUOTE(ZeroSP @ Nov 27 2011, 11:58 PM) Wa bro, you not only good in camera... But this kind of DIY too... camera?  |
|
Topic ClosedOptions
|
| Change to: |  0.0221sec 0.0221sec
 0.45 0.45
 7 queries 7 queries
 GZIP Disabled GZIP Disabled
Time is now: 9th December 2025 - 05:38 PM |
 Quote
Quote