

 Aug 23 2009, 10:34 PM

However, I have been banging my head for two days when it came to remove the ATX plug pins. I have tried the staple trick to remove them, but I never managed to remove even one: either I was using a small staple two soft and it was bending when I tried to stick inside before it reaches the small ridge, or I was using a thicker and stronger stapler but there was not enough space to slide it on both side of the pin.
I haven't tried to buy a removal tool though. This is because knowing me, I would have broken a dozen of them before I finish to sleeve the whole PSU

So I think I found a very easy (and very cheap
 ) alternative using a RM 3 tool (sorry if a similar solution has already been mentioned in the thread, I haven't read all pages).
Below is how I proceed (click on the pictures for higher resolution)
1) I bought a RM 3 precision screwdrivers set as below:

2) Using the smallest flat head screwdriver (1mm), I slide it on one side of the pin I want to remove, the flat head being parallel to the side it is very easy to go in between the pin and the edge:

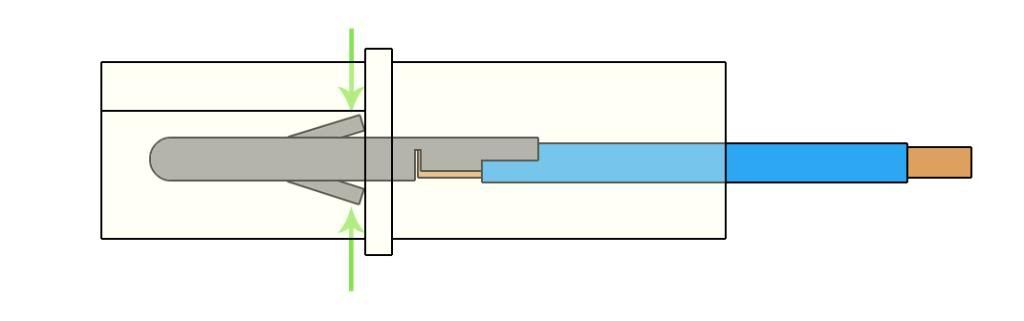
3) I insert firmly the screwdriver inside until I feel I reached the ridge (at the level of the green arrow in the diagram below). Be careful, it is possible to cut through the ridge with the screwdriver if too much force is applied. Afterward, the pin may not hold very well because the ridge has been cut. To avoid that, you can mark on the screwdriver how far you should go before to stick it inside.
a) check how far you should go

b) stick the screwdriver in until you reach the ridge inside the plug (you will feel more resistance once reached)

Don't go further than the green arrow in the diagram below:
4) With a pair of pliers, grab the screwdriver, turn 180 degrees and then remove the screwdriver:

5) Repeat steps 2 to 4 for the other side of the pin.
6) Just pull on the wire the other side and it will come off with no resistance at all.

What happens is when turning the screwdriver, the flat head will pry on the "fins" (not sure how you call the small bit pointed by the green arrow in the diagram above) and put it back into place. Then there is nothing to stop the pin to slide out:


This post has been edited by r4st4m4n: Aug 23 2009, 10:35 PM
 Quote
Quote
 0.0220sec
 0.58
0.58
 7 queries
 GZIP Disabled