

just for pratice

The Complete PSU Sleeving Guide - Tips & Tricks, For the casemod enthusiast. Pics inside
|
|
 Aug 20 2009, 02:23 PM Aug 20 2009, 02:23 PM
|
 
Senior Member
939 posts Joined: Jan 2007 |
@lingloong
just for pratice |
|
|
|
|
|
Aug 23 2009, 10:34 PM
|

Junior Member
156 posts Joined: Aug 2007 From: Damansara |
Thanks uglyvamp for the how to.
However, I have been banging my head for two days when it came to remove the ATX plug pins. I have tried the staple trick to remove them, but I never managed to remove even one: either I was using a small staple two soft and it was bending when I tried to stick inside before it reaches the small ridge, or I was using a thicker and stronger stapler but there was not enough space to slide it on both side of the pin. I haven't tried to buy a removal tool though. This is because knowing me, I would have broken a dozen of them before I finish to sleeve the whole PSU  So I think I found a very easy (and very cheap  ) alternative using a RM 3 tool (sorry if a similar solution has already been mentioned in the thread, I haven't read all pages). ) alternative using a RM 3 tool (sorry if a similar solution has already been mentioned in the thread, I haven't read all pages).Below is how I proceed (click on the pictures for higher resolution) 1) I bought a RM 3 precision screwdrivers set as below:  2) Using the smallest flat head screwdriver (1mm), I slide it on one side of the pin I want to remove, the flat head being parallel to the side it is very easy to go in between the pin and the edge:  3) I insert firmly the screwdriver inside until I feel I reached the ridge (at the level of the green arrow in the diagram below). Be careful, it is possible to cut through the ridge with the screwdriver if too much force is applied. Afterward, the pin may not hold very well because the ridge has been cut. To avoid that, you can mark on the screwdriver how far you should go before to stick it inside. a) check how far you should go  b) stick the screwdriver in until you reach the ridge inside the plug (you will feel more resistance once reached)  Don't go further than the green arrow in the diagram below: 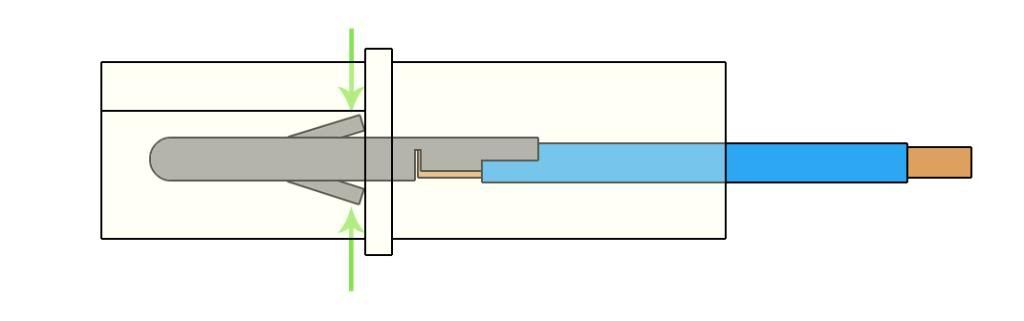 4) With a pair of pliers, grab the screwdriver, turn 180 degrees and then remove the screwdriver:  5) Repeat steps 2 to 4 for the other side of the pin. 6) Just pull on the wire the other side and it will come off with no resistance at all.  What happens is when turning the screwdriver, the flat head will pry on the "fins" (not sure how you call the small bit pointed by the green arrow in the diagram above) and put it back into place. Then there is nothing to stop the pin to slide out:   This post has been edited by r4st4m4n: Aug 23 2009, 10:35 PM |
|
|
Aug 25 2009, 06:17 PM
|

Senior Member
1,666 posts Joined: Jan 2003 From: Spore/JohorBP |
Hi all ...
We have "develop" ourself an ATX removal tool. With a grinding machine, I grind down to size that fit into the side of the ATX pin perfectly with the exact depth. I can start to custom this item for you guys  Probably selling around RM 20 per piece. ( the grinding service + the tool ) Probably selling around RM 20 per piece. ( the grinding service + the tool )    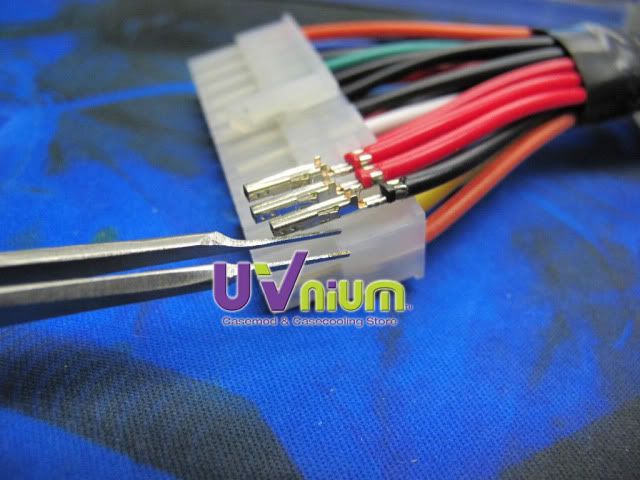 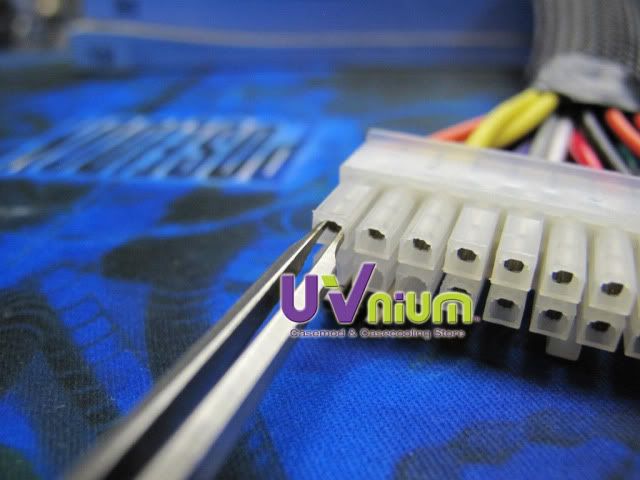 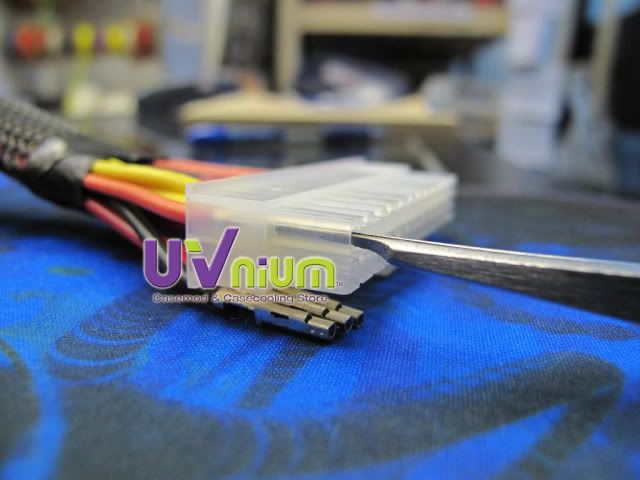 |
|
|
Aug 26 2009, 10:25 AM
|

Senior Member
902 posts Joined: Mar 2009 |
very nice =)
thanx for making it easier for us to diy |
|
|
Aug 27 2009, 02:34 PM
|

Senior Member
1,256 posts Joined: Aug 2007 From: Ampang TO Sibu |
 I'm gonna start my 1st self sleeving soon. When it the "tool" available for sale bro? Placed some sleeving package from niclasteoh, hoping to get it by this weekend so that I can sleeve my 1st PSU ~ Huntkey GreenStar 550W  |
|
|
Aug 30 2009, 07:59 PM
|

Senior Member
558 posts Joined: Jun 2006 From: KL Sentral - Segamat |
kudos uglyvamp!
i had the idea too...but using those cheap precision screw nice touch there  |
|
|
|
|
|
Sep 2 2009, 03:30 PM
|
|
Senior Member
1,666 posts Joined: Jan 2003 From: Spore/JohorBP |
just pop me a PM to buy the tool ok
Rm 25 each. In the event of it breaking, u just send it back to me & I'll charge another RM 10 ( service ) + pos back to u again. This tool can re-mod 3times before it gets too short. haf fun modding all. |
|
|
Sep 2 2009, 04:21 PM
|
|
Junior Member
156 posts Joined: Aug 2007 From: Damansara |
It looks good. I wish you had posted before I sleeved my PSU
 |
|
|
Oct 14 2009, 08:31 PM
|
|
Junior Member
80 posts Joined: Feb 2009 |
HYe guys...
where i can get the UV SLEEVING SERVICE for my psu?? I checked the moderno but they had stop from last year.....huhuhu |
|
|
Oct 15 2009, 10:02 AM
|

Senior Member
4,496 posts Joined: Apr 2005 From: KL |
@KTS
Check from Uglyvamp, he got UV sleeving service, but he's at SG loh |
|
|
Oct 16 2009, 12:02 AM
|
|
Junior Member
80 posts Joined: Feb 2009 |
QUOTE(Doom @ Oct 15 2009, 10:02 AM) @KTS Thanks DoomCheck from Uglyvamp, he got UV sleeving service, but he's at SG loh  |
|
|
Oct 16 2009, 01:57 AM
|

Senior Member
795 posts Joined: Mar 2008 From: PJ,SS2,TTDI,Kepong |
WAoo....this is the perfect tool la.....those staples make me wanna vomit....loose my patients....
|
|
|
Oct 28 2009, 10:23 PM
|
|
Junior Member
224 posts Joined: Jan 2003 |
Yo uglyvamp, where are you, i paid you 1 month++ ago and i still havent received the items!
 |
|
|
|
|
|
Nov 26 2009, 11:51 AM
|

Newbie
1 posts Joined: Nov 2009 |
really new here..
|
|
|
Dec 8 2009, 07:38 PM
|

Junior Member
42 posts Joined: Nov 2009 From: puchong |
ya..me to..but nice tips..
 |
|
|
Dec 24 2009, 03:31 AM
|
|
Newbie
1 posts Joined: May 2006 |
done this for a customer....
feels like hell having to remove all those pin and arranging them back in.. |
|
|
Feb 10 2010, 01:18 AM
|

Senior Member
1,343 posts Joined: Jun 2006 From: Wangsa Maju/TTDI/Ampang |
need help here. currently started sleeving all those i/o ports wires. number 1 headache, how to sleeve the front i/o port usb? any chance anyone successfully remove the wires from the connector before?
 edit: problem solved, woots  This post has been edited by supernothing: Feb 12 2010, 12:50 AM |
|
|
Mar 19 2010, 12:15 AM
|

Junior Member
253 posts Joined: Jan 2003 |
Haish,why in d earth i didn't bother to refer to dis thread b4.now my psu look half-coocked
QUOTE(supernothing @ Feb 10 2010, 01:18 AM) edit: problem solved, woots great,wanna share? |
|
|
Mar 19 2010, 12:58 AM
|
|
Senior Member
4,496 posts Joined: Apr 2005 From: KL |
u just need a very slim flat screw driver to lift the plastic which holding the pins .. before pulling it out.
After that it's ready to be sleeve, make sure to label the cable before going for sleeving.. especially of it is USB and audio port. |
|
|
May 1 2010, 03:36 AM
|
|
Senior Member
7,863 posts Joined: May 2007 From: highbury |
if sleeve the psu with uv spiral sleeve, we still need to detach the molex connector ?
|
| Change to: |  0.0237sec 0.0237sec
 0.59 0.59
 6 queries 6 queries
 GZIP Disabled GZIP Disabled
Time is now: 2nd December 2025 - 05:39 PM |
 Quote
Quote