PwnageTool will work with the iPhone 4, iPhone 3GS, iPod Touch 4G, iPod Touch 3G, iPad 1, and Apple TV 2nd generation. It still does not work on iPad2.
PwnageTool is a Mac only tool and is the only way to preserve your baseband to make sure you can unlock later on.
Before you start, please make sure you go over
HERE and read properly.
Step 1 : Download PwnageTool
HERE or
HERE. Also download the 4.3.1 IPSW
HEREWhen downloading the IPSW file, it is best to download it with Firefox since Safari often auto extracts it!
Step 2 : Launch PwnageTool and agree to the warning by clicking OK.
Step 3 : Click to select Expert Mode from the top menu bar
Step 4 : 
Click to select your device. A check-mark will appear over the image of the device. Click the blue arrow button to continue.
Step 5 : 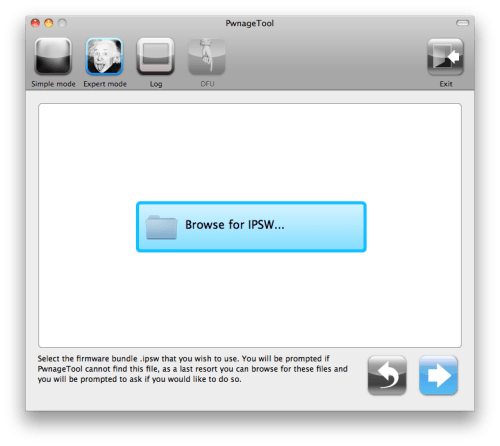
PwnageTool should offer you the option to use the firmware you downloaded in step 1, or to browse for a firmware on your computer. If you downloaded it to your desktop, PwnageTool should find it for you automatically. Select the firmware and click the blue arrow to continue.
Step 6 : 
Select “General” and click the blue arrow to continue.
Step 7 : 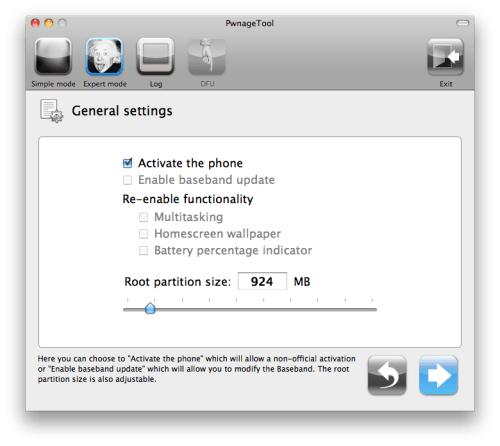
The General settings allows you to decide the partition size, move the root partition to somewhere around 1,000 MB.
Check Activate the phone if you are not with an official carrier then click the blue arrow button.
Deselect Activate if you have an iPhone legitimately activated on an official carrier.
Step 8 : 
You will now be taken to the Cydia settings. From here, you can select packages to have pre-installed on your jailbroken iPhone. This is a great way to install jailbreak apps directly, which will save you time later on. For this tutorial, we will not install any package. Click the blue arrow to continue.
Step 9 : 
You will now be taken to the “Custom Packages Settings”. Make sure “Cydia Installer” in selected. Click the blue arrow to continue.
Step 10 : 
You are now ready to begin the pwnage process! Click the Build button to select it then click the Blue arrow button to begin.
Step 11 : 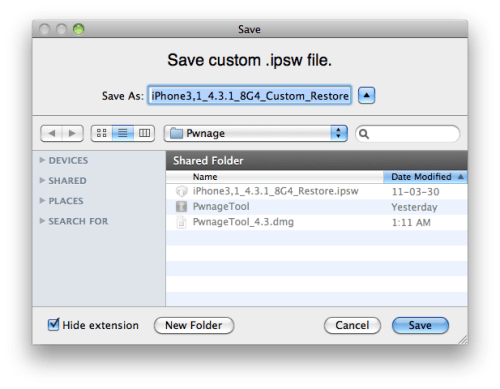
Select a location to save your custom iPSW. I suggest saving to the dektop. PwnageTool will now build your custom firmware, which might take a few minutes.
Step 12 : 
Your IPSW is now being built. It will take some time.
Step 13 : 
Once done, PwnageTool will ask you to conenct your iPhone to your computer in order to enter DFU mode. Just plug your iPhone in and follow the steps.
Once your iPhone is successfully in DFU mode, PwnageTool will prompt you to launch iTunes. It should tell you it has detected an iPhone in recovery mode.Click OK to confirm.
Step 14 : Still in iTunes, hold the Option/Alt key on your Mac while clicking on Restore. Make sure you are holding the Option key. iTunes will give you the option to select a firmware to restore to. Select the custom ISPW firmware you created and saved in step 10.
Step 15 : iTunes will now restore your iPhone using the custom IPSW. It’s probably going to take a few minutes. When it’s done, your iPhone will be jailbroken and running iOS 4.3.1. You should now have Cydia on your iPhone springboard. Congrats, you just jailbroke your iPhone.


 Apr 5 2011, 07:02 PM


 Quote
Quote

 n for local phone, using redsn0w is better, am i right? as local set does not need to rely unlock?
 thxs
thxs 


 0.0220sec
 0.77
0.77
 7 queries
 GZIP Disabled