

 Jan 17 2011, 04:25 PM, updated 15y ago


By the way, there's some warning from the writer:
QUOTE
Disclaimer :
1) Any kind of overclocking practice is neither supported nor encouraged by hardware manufacturers as it could negatively affect your components (resulting in instability or even permanent damage) if not carried out properly. So, do it at your own risk!
2) This overcloking guide is based on our lab tests and your actual results may vary. There is a good chance that the information we provide is not entirely accurate because the Sandy Bridge itself use a completely revised architecture whose characteristics have yet to be fully explored. We will, therefore, update this article if necessary.
QUOTE
Hardware Preparations
A good overclocker always gets his/ her components ready beforehand. To begin, you will need to prepare the following items:
a) CPU : Sandy Bridge K-Series CPU (i5-2500K, i7-2600K)
b) Motherboard : P67-based motherboard
c) RAM :Any kind of memory, we recommend using DDR3-1600MHz modules for optimum performance, though.
d) PSU : Depends on your system’s overall power consumption.
e) CPU Cooler : A third-party HSF of reasonable quality is recommended.
As for the processor itself, we recommend using a “K” series Sandy Bridge. Non-K series Sandy Bridges are severely limited when it comes to overclocking. You don’t need to spend too much time selecting special memory modules because Sandy Bridge overclocking relies pretty much on the processor’s multiplier, so that even a value class DDR3-1333 should suffice. However, we would still recommend you to use at least 1600 MHz, DDR3 modules for optimum performance. Additionally, keep in mind that although the power consumption of a Sandy Bridge platform is relatively small, you still need a sufficiently powerful PSU capable of sustaining the entire system. A 500watt (pure power) PSU should be just about enough to power up a Core i7-2600K that is overclocked to 4.5 GHz, along with a single GeForce GTX 460 graphics card.
Sandy Bridge’s operating temperature is relatively low compared to its predecessors. Even the stock HSF should provide sufficient cooling for a 4-4.2 GHz Sandy Bridge. However, for durability reasons, we recommend you to replace the default cooler with a third-party HSF of higher quality. Another obvious advantage from using a better HSF is that you will have more headroom for your overclocking.
Software Preparation
In overclocking, the right software is just as important as the right hardware. They will prove useful in testing the stability of your overclocked system. The following applications can help you achieve optimum overclocking results:
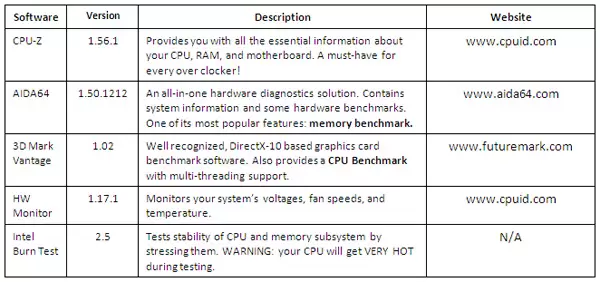
We will be using all of the above softwares for our overclocking practice this time.
Overclocking Practice – Test Bed

These are the hardware components used as our testbed in this overclocking guide article:
CPU : Intel Core i7-2600K (Retail Stepping D2)
Motherboard : MSI P67A-GD65, BIOS 1.7B3 & 1.7B4
RAM : Kingston HyperX 2x1GB DDR3-2333C9
Graphics Card : Digital Alliance GTX 580 1536MB
HDD : Seagate 250GB Sata
PSU : CoolerMaster SilentPro Gold 800W
HSF : Noctua NH-D14
OS : Win 7 Ultimate 32-bit
Settings Example
Below is our recommended configuration for overclocking with all the voltage settings set at their strong>DEFAULT values.

Stability & Performance Testing
Now that we have overclocked the system, use the Intel Burn Test v2.5 software to see if it’s stable enough.
This is fairly easy to do. You just have to run the program, set the amount of Threads to 8, , and then specify the amount of iteration runs. We suggest you to run at least 25 to 30 iterations. The settings should look like this:

If all goes well, you will see the following message at some point after running the program:

Congratulations! The Intel Burn Test Software has confirmed that your system is stable!
Source: http://www.jagatreview.com/2011/01/sandy-b...clocking-guide/A good overclocker always gets his/ her components ready beforehand. To begin, you will need to prepare the following items:
a) CPU : Sandy Bridge K-Series CPU (i5-2500K, i7-2600K)
b) Motherboard : P67-based motherboard
c) RAM :Any kind of memory, we recommend using DDR3-1600MHz modules for optimum performance, though.
d) PSU : Depends on your system’s overall power consumption.
e) CPU Cooler : A third-party HSF of reasonable quality is recommended.
As for the processor itself, we recommend using a “K” series Sandy Bridge. Non-K series Sandy Bridges are severely limited when it comes to overclocking. You don’t need to spend too much time selecting special memory modules because Sandy Bridge overclocking relies pretty much on the processor’s multiplier, so that even a value class DDR3-1333 should suffice. However, we would still recommend you to use at least 1600 MHz, DDR3 modules for optimum performance. Additionally, keep in mind that although the power consumption of a Sandy Bridge platform is relatively small, you still need a sufficiently powerful PSU capable of sustaining the entire system. A 500watt (pure power) PSU should be just about enough to power up a Core i7-2600K that is overclocked to 4.5 GHz, along with a single GeForce GTX 460 graphics card.
Sandy Bridge’s operating temperature is relatively low compared to its predecessors. Even the stock HSF should provide sufficient cooling for a 4-4.2 GHz Sandy Bridge. However, for durability reasons, we recommend you to replace the default cooler with a third-party HSF of higher quality. Another obvious advantage from using a better HSF is that you will have more headroom for your overclocking.
Software Preparation
In overclocking, the right software is just as important as the right hardware. They will prove useful in testing the stability of your overclocked system. The following applications can help you achieve optimum overclocking results:
We will be using all of the above softwares for our overclocking practice this time.
Overclocking Practice – Test Bed
These are the hardware components used as our testbed in this overclocking guide article:
CPU : Intel Core i7-2600K (Retail Stepping D2)
Motherboard : MSI P67A-GD65, BIOS 1.7B3 & 1.7B4
RAM : Kingston HyperX 2x1GB DDR3-2333C9
Graphics Card : Digital Alliance GTX 580 1536MB
HDD : Seagate 250GB Sata
PSU : CoolerMaster SilentPro Gold 800W
HSF : Noctua NH-D14
OS : Win 7 Ultimate 32-bit
Settings Example
Below is our recommended configuration for overclocking with all the voltage settings set at their strong>DEFAULT values.
Stability & Performance Testing
Now that we have overclocked the system, use the Intel Burn Test v2.5 software to see if it’s stable enough.
This is fairly easy to do. You just have to run the program, set the amount of Threads to 8, , and then specify the amount of iteration runs. We suggest you to run at least 25 to 30 iterations. The settings should look like this:
If all goes well, you will see the following message at some point after running the program:
Congratulations! The Intel Burn Test Software has confirmed that your system is stable!
 Quote
Quote

 0.0114sec
 0.46
0.46
 5 queries
 GZIP Disabled