Welcome Guest ( Log In | Register )

Outline · [ Standard ] · Linear+

 Classic Casing - RECYCLED, Super Budget Mod [Full version]

views
     
TSmpowerwind
post Jan 8 2011, 10:48 AM, updated 15y ago

Getting Started
**
Junior Member
99 posts

Joined: Oct 2007
As a PC fans, im really want my own style PC and at the end i had built this toy.
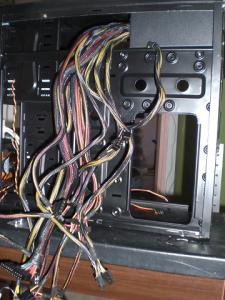
I took about half year to design and modified it, it's not easy to finish your work especially you dont have enough resource and tool to support with. I even gave up when i struggling at front panel design, dont know which style i had to mod. After front panel, I had to think at the power on/off, HDD LED, cable management & etc. It really faint me up when i sleeve the PSU cable, moreover it's a non modular PSU with a bunch of wire.
My personal advice for new DIYer: Dont mod your casing if your mind are not ready (Tools, hardware, money, design & time), im sure you will stop at somewhere. If you had start it, better finish in 1 week or you will be bored starting second week.


So here's the my casing's first look, its damn ugly... rclxms.gif rclxms.gif
Its basically an oldskool PC with Pentium 4 socket 478 which my mum bought me almost ten years ago.
I had dismantled all parts inside and pending for hard mod
.

Attached Image Attached Image


My front panel main material will be base on this two recycle stuff. brows.gif brows.gif
Its combination of waste plastic car plate & heavy vehicle air filter.

Attached Image Attached Image

Here's the plan,

Attached Image Attached Image

You know what, im just using a makita grinder all the way.
Nothing is impossible, im glad i had make it biggrin.gif biggrin.gif
Attached Image
It's really damn hard to hold & control, require huge hand strength to hold the tool and cut it slowly from mins to mins.
I spend one day just to cut all those hole and then spend another day to plan & cut the front panel
.


This post has been edited by mpowerwind: Jan 20 2011, 04:50 PM
TSmpowerwind
post Jan 8 2011, 10:52 AM

Getting Started
**
Junior Member
99 posts

Joined: Oct 2007
Sadly, i don't have a lot of pictures showing the actual process.
But i still manage to take some, here they are...

Had spray the casing to black using cheapest paint tongue.gif
Fitting in the mobo which i had bought to see whether the color is match or not brows.gif

Attached Image

Due to the bottom space is reserved for super long graphic card, i move hard drive to the top with purchased of 5.25 bay rafter to hold it. thumbup.gif
Behind the casing, i had cut a 120mm fan hole and fit it with a sythe 120mm fan
.


Attached Image

So here's the front view of my casing. rclxms.gif
Had cut two holes for 80mm Xigmatek fan, hope orange color suit with the casing.
I add another 120mm Xigmatek fan in front of the hard drive for cooling purpose.


Attached Image

Here's the another side view of the casing.
Haven sleeve the wire up, looks ugly...
shocking.gif

Attached Image

The casing already looks different now in black, at least looking great if compare to the original... thumbup.gif

This post has been edited by mpowerwind: Jan 11 2011, 10:16 AM
TSmpowerwind
post Jan 8 2011, 10:53 AM

Getting Started
**
Junior Member
99 posts

Joined: Oct 2007
-Cable management-

This is the worst cable management i ever had, flies can't get out from there once enter. sweat.gif sweat.gif


Attached Image Attached Image Attached Image

Almost done, the color match my favorite C4F mobo.
How's my cable management skill, still good i guess. At least the space is tidy and looks good. nod.gif nod.gif
Hard drive had to move above DVD rom area, no more space below due to the graphic card
.


Attached Image

My front panel looks, no bad right... tongue.gif tongue.gif
This is the first prototype... icon_rolleyes.gif
I just stick the panel with hot melt silicon glues in the early stage, you will see my final stage of front panel later.


Attached Image Attached Image

This post has been edited by mpowerwind: Jan 20 2011, 03:46 PM
TSmpowerwind
post Jan 8 2011, 10:53 AM

Getting Started
**
Junior Member
99 posts

Joined: Oct 2007
-Front panel appearance-

This was my final prototype, black overally


Attached Image Attached Image

Attached Image

Views with monitor... rclxms.gif
Had cut the side panel by my fren helps, don't have any picture progress about it.
It's a thin acrylic which i just stick with double side tape
.


Attached Image
Attached Image

This post has been edited by mpowerwind: Jan 20 2011, 04:17 PM
TSmpowerwind
post Jan 8 2011, 10:54 AM

Getting Started
**
Junior Member
99 posts

Joined: Oct 2007
-Galleria-

-Interior Views-

Pictures said them all... smile.gif


Attached Image Attached Image Attached Image

Attached Image Attached Image Attached Image

Attached Image Attached Image Attached Image

Attached Image


-Front Views-
Attached Image Attached Image Attached Image
Attached Image

My pc highest achievement + details, i know it's not good enough... cry.gif

Attached Image

Overally im very satisfied with my works, its excited and fun once you finalized all.

As Richard Branson said: "Screw it, Let's do it"

Best describe my casing works


How's the difference between them... icon_rolleyes.gif
85% mod totally

Attached Image Attached Image


Total expenses for casing mod material only:

Flat Black spray X3 - RM20
Power button switch - RM2
Reset button switch - RM2

Total - RM24-

That's really cheap enough... nod.gif

Of course with my fren helps and most of the materiasl are grab from vehicles wasted parts.

This post has been edited by mpowerwind: Jan 20 2011, 05:01 PM
TSmpowerwind
post Jan 8 2011, 05:09 PM

Getting Started
**
Junior Member
99 posts

Joined: Oct 2007
QUOTE(Jinster @ Jan 8 2011, 11:33 AM)
looking forward to seeing ur progress ^^v
seems like there's a lot of things to be done specially the motherboard area and the I/O panel as i think latest ones won't be able to fit~
*
Can, luckily this casing can fit in normal ATX motherboard perfectly. biggrin.gif
TSmpowerwind
post Jan 9 2011, 04:25 PM

Getting Started
**
Junior Member
99 posts

Joined: Oct 2007
QUOTE(da drummer @ Jan 8 2011, 09:33 PM)
wow...someone got new project  rclxms.gif
gd luck ts~what the theme? brows.gif
*
Huh blink.gif , i dont set a theme to mod it.
I mod it by following my mind & mood. tongue.gif tongue.gif
TSmpowerwind
post Feb 4 2011, 03:03 AM

Getting Started
**
Junior Member
99 posts

Joined: Oct 2007
QUOTE(selipars @ Jan 31 2011, 04:57 PM)
what size  of fan you put behind the casing (outside) and can you tell me how you attach it...
*
Just a normal xigmatek 120mm fan and a fan cover.
I just put it vertically at behind, because i can't find anywhere to mount it.
TSmpowerwind
post Feb 4 2011, 11:54 AM

Getting Started
**
Junior Member
99 posts

Joined: Oct 2007
Sadly my casing already reach its maximum limitation.
The space was really crouded,
It's hot when i crossfire it, gonna need a super high cfm exhaust fan behind. sad.gif
TSmpowerwind
post Feb 9 2011, 04:46 PM

Getting Started
**
Junior Member
99 posts

Joined: Oct 2007
Thanks for all of your comments, really apreaciate smile.gif
FYI, im using scythe kaze-jyuni 1900rpm 110cfm now as exhaust.
The sound was loud, can't imagine if i exchange all of them to scythe.
My pc will be looks like a vacuum cleaner....""
TSmpowerwind
post Feb 19 2011, 12:44 AM

Getting Started
**
Junior Member
99 posts

Joined: Oct 2007
QUOTE(loonsave @ Feb 15 2011, 09:24 PM)
cool mod with your effort. You make me feel wanna mod my old cheapskate ATX casing as well. lol
*
Come on, mod it in your way. smile.gif
Show us your creativities, it doesn't need to be costly.
Good luck to you bro... biggrin.gif
TSmpowerwind
post Feb 19 2011, 08:16 PM

Getting Started
**
Junior Member
99 posts

Joined: Oct 2007
QUOTE(kakicam @ Feb 19 2011, 06:41 AM)
u guys are so rajin not like me..
*
Im not hardworking actually, i spend more than 2 month to complete this pc... tongue.gif
My working progress was very slow and slow laugh.gif
TSmpowerwind
post Mar 19 2011, 03:04 AM

Getting Started
**
Junior Member
99 posts

Joined: Oct 2007
QUOTE(cloudwan @ Mar 18 2011, 11:22 AM)
Naise mod there mpowerwind, the front panel there at the 2 small fan part really reminds me of bender from the futurama liao


Haahaaa, you remind me my favorite drama last time biggrin.gif
It does looks like Bender... nod.gif

QUOTE(deep_hunter @ Mar 18 2011, 02:43 PM)
bro..seriously want to know how u made that front panel..looks tempting
u can custom made for us?
Just go buy a car plate as you can find at any accesories shop & cut it slowly by you saw. Sure you have to plan & design first la... rclxms.gif
Im sure you will feel great if you can do it yourself...

QUOTE(jaQ-Ass @ Mar 19 2011, 02:18 AM)
Damn. That is unique. Nice mod.
Yaya, some more looks like Bender... blink.gif blink.gif
TSmpowerwind
post Apr 1 2011, 12:19 AM

Getting Started
**
Junior Member
99 posts

Joined: Oct 2007
QUOTE(aidilzulfadli @ Mar 30 2011, 10:42 PM)
wow!! very2 gud job bro..very nice and creative mod...mau jual ka?? haha..joking..
*
QUOTE(sherren @ Mar 31 2011, 01:20 AM)
good job  rclxms.gif it looks good afterall
*
HaaHaa, so far so good i think... tongue.gif
I thinking of another watercool case mod blush.gif
TSmpowerwind
post Apr 10 2011, 10:38 PM

Getting Started
**
Junior Member
99 posts

Joined: Oct 2007
QUOTE(aidilzulfadli @ Apr 10 2011, 02:47 AM)
ur mod inspire me to do sumthin with my old casing la bro... hmm.gif
curi idea sikit boleh yer... icon_idea.gif
*
No problem, no copyright here... blink.gif


Change to:
| Lo-Fi Version
0.0289sec    0.68    7 queries    GZIP Disabled
Time is now: 2nd December 2025 - 03:24 AM