Welcome Guest ( Log In | Register )

Bump Topic Topic Closed RSS Feed
128 Pages « < 35 36 37 38 39 > » Bottom

Outline · [ Standard ] · Linear+

 Alienware Mothership v5, Once you'd enter, you'll never leave...

views
     
teikwing
post Jun 22 2010, 08:40 PM

Dah Macan?
*******
Senior Member
3,239 posts

Joined: Oct 2006
From: Sydney, NSW


QUOTE(raven143 @ Jun 22 2010, 07:25 PM)
have been wondering, my M11x last about 3 hours plus on Balanced battery setting... is it normal? the advertised 8hours under what setting?
*
i got around 7 hours hours with integrated graphics, WiFi on and brightness at 1-2 bar. merely web browsing. are you on integrated or GT335M? 2.5-3 hours for me on dedicated graphics.
julchin_09
post Jun 22 2010, 09:59 PM

"Complicated Nutter"
*******
Senior Member
7,485 posts

Joined: Jun 2005
From: Kuala Lumpur


OK, First my apologies for making Doc wait for me.....

First for Doc. The Black & Decker handheld vacuum which might come in handy in dusty situations....
Attached Image

The tools I used for this operation (Screw driver set, extra thermal pads, heatsink and gpu surface clearner and purifier, Artic Cooling Thermal paste, handwipes)
Attached Image

Firstly You'll need to have in pocession an ATI 5870 Card if you're switching to that. Also, you will need to remove all drivers from NVidia from your M15x using programs such as ccleaner or driversweeper. Once you've removed all and you restart, you screen will be like this but don't be alarmed as you're running what ever card which is inside but on default VGA display.
Attached Image

Turn the M15x over and place a sponge or cloth underneat the monitor as to not scratch it. Remove the battery and press the power button for 15seconds before opening up your unit to fully discharge it. You'll also need to REMEMBER TO DISCHARGE YOURSELF AND NOT TO WEAR CLOTHES THAT MIGHT BUILD UP CHARGE as a safety precaution. Read on Discharging yourself online just to be safe. I will notbe held responsible for any error on those operating their units by themselves voiding their warranty/spoiling their units etc. 
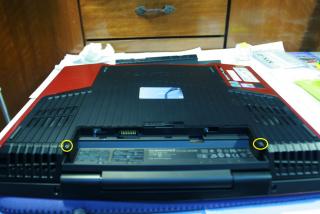
Do this at your OWN RISK!. Remove the screws circled in YELLOW and slide the back cover upwards revealing the whole internals of your m15x.
Attached Image

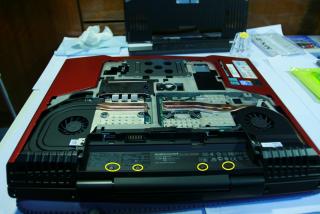
Once you've taken off the back cover, remove the 4 screws circled here to be able to remove the front panel in the next step.
Attached Image

You'll need to gently pry the front touch control panel using your fingers. Start from the right (star) and work your way to the left.
Attached Image

Now you've exposed the back gpu fan grill screws. Remove these 2 screws.
Attached Image

Once you've done that, turn over the unit again viewing the back portion. As you can see the fan is already removed here but u can remove yours by unscrewing the 2 screws in yellow. The red circle is the screw previously removed from the back panel/cover.
Attached Image

Here you can see the removed Fan grill and the fan as well. The screws circled in yellow are those to remove the GPU heatsink from the GPU. Remember to unscrew them slightly one by one before removing them fully altogether to ensure that removing the the heatsink will be easier. You will have to wriggle the heatsink slightly as the thermal paste and pads inside are sticking to it....
Attached Image


Now you will see your GPU exposed with the 2 screws circled in yellow left to be able to remove the card. Once you've removed the screws the card will pop up at an angle, gently slide it outwards: CAUTION!! DO NOT TOUCH THE COMPONENTS WITH YOU FINGERS AS STATIC CHARGES CAN SHORT CIRCUIT COMPONENTS.
Attached Image

Placing the heatsink and the GPU side by side, remember the position of the thermal pads as you'll be reusing them all alter. The areas circled in RED are those where the pads should be on which will be slightly similar in the ATI Card.
Attached Image

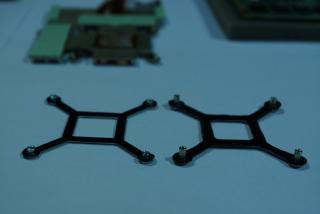
Here is the comparison of the NVidia GTX 260M(left) and the ATI 5870(Right). The arrows(yellow) are are suggestion as to where to transfer the square thermal pads from the NVidia card. The screws like structure in RED is GPU Mounting which are of different heights. You will need to remove the ATI Mouting from the back and replace it with the NVidia mounting from the 260M. Be EXtremely carefull and gentle. Don't have to rush thru. Use a screwdriver and slowly pry them out. This is a delicate process...
Attached Image

Height difference between the Nvidia(left) which is shorter compared to the ATI(Right).
Attached Image

Before applying the new thermal paste, I used ARTIC CLEAN 2 STEP remover to remove and purify the old paste and surface respectively. First step is to remove, 2nd is to purify. I did both steps at least twice.
Attached Image

I use ARTIC COOLING MX-2 Thermal paste. Try out the texture before applying....then you can use an old card to spread the thermal paste. Search online for videos for applying the paste on youtube. I applied a pea size drop and used my old driving license card to evenly spread it. I did the same for the GPU Chip and the GPU Heatsink.
Attached Image

A Closeup view of the chip. The areas circled show the reduced height of the GPU Mount after swapping with the NVidia card. Slot the card in the same way the NVidia card was taken out. Then screw the screws back in.
Attached Image

Here you can see both the heatsink and the GPU card before I finally replace the heatsink over it. The areas in RED are covered with additional thermal pads I purchased seperately as the ones from the NVidia card were insufficient to cover all. Once you've replaced the heatsink, do the identical steps above backwards till you end back at the beginning.
Attached Image

Once the new card is inside, boot up the system and the M15x will detect the card as a VGA Display. This is because the drivers are not installed yet. Download the ATI Catalyst driver from the AMD Website. ATI CATALYST 10.5 worked for me. Then install it and update the GPU Driver. Once updated the system will recognise the GPU as a 5800 series card and VOILA you have successfully installed the new card into your system. Remember to always practise caution and safety steps as to not kill the card or the system. Power should never be connected and the same goes for the battery. I used rubber gloves at some point during the process.....

This post has been edited by julchin_09: Jun 23 2010, 12:30 AM
budblely
post Jun 22 2010, 11:33 PM

Getting Started
**
Junior Member
134 posts

Joined: Nov 2008
From: www.khengyu.com


QUOTE(julchin_09 @ Jun 22 2010, 09:59 PM)
OK, First my apologies for making Doc wait for me.....

First for Doc. The Black & Decker handheld vacuum which might come in handy in dusty situations....
Attached Image

The tools I used for this operation (Screw driver set, extra thermal pads, heatsink and gpu surface clearner and purifier, Artic Cooling Thermal paste, handwipes)
Attached Image

» Click to show Spoiler - click again to hide... «


bro julchin..u r the man notworthy.gif notworthy.gif
TSMr.Docter
post Jun 22 2010, 11:48 PM

Doctorpreneurs
*******
Senior Member
5,367 posts

Joined: Aug 2009


» Click to show Spoiler - click again to hide... «

so 1337 notworthy.gif notworthy.gif notworthy.gif

thanks for the details guide. and thanks for the picture of the vacuum too! laugh.gif really appreciate it.

will linking your post in the frontpage now! rclxms.gif

raven143
post Jun 22 2010, 11:51 PM

Casual
***
Junior Member
312 posts

Joined: Apr 2006


QUOTE(teikwing @ Jun 22 2010, 08:40 PM)
i got around 7 hours hours with integrated graphics, WiFi on and brightness at 1-2 bar. merely web browsing. are you on integrated or GT335M? 2.5-3 hours for me on dedicated graphics.
*
3 hours plus with integrated graphics, not with 335m on.. hmmm.. hope its not a battery prob..
acidkill
post Jun 23 2010, 12:00 AM

OMG
*****
Senior Member
938 posts

Joined: Jan 2003
From: Kajang/Bangi


» Click to show Spoiler - click again to hide... «


Very useful quide thumbup.gif
And how much is the vacumm ? smile.gif

This post has been edited by acidkill: Jun 23 2010, 12:10 AM
julchin_09
post Jun 23 2010, 12:35 AM

"Complicated Nutter"
*******
Senior Member
7,485 posts

Joined: Jun 2005
From: Kuala Lumpur


QUOTE(budblely @ Jun 22 2010, 11:33 PM)
» Click to show Spoiler - click again to hide... «


bro julchin..u r the man  notworthy.gif 
*
You're welcome....

QUOTE(Mr.Docter @ Jun 22 2010, 11:48 PM)
» Click to show Spoiler - click again to hide... «

so 1337 notworthy.gif  notworthy.gif 

thanks for the details guide. and thanks for the picture of the vacuum too! laugh.gif really appreciate it.

will linking your post in the frontpage now! rclxms.gif
*
No biggie man. Thanks for being patient.... thumbup.gif

QUOTE(acidkill @ Jun 23 2010, 12:00 AM)
» Click to show Spoiler - click again to hide... «

Very useful quide  thumbup.gif
And how much is the vacumm ?  smile.gif
*
Thanks. Hope it is.

The vacuum is about RM250. Battery works for over 10mins of vacuuming and at Turbo, it reduces the usage time a bit but its good for sucking up dust from the keyboard and the fan vents.... thumbup.gif

This post has been edited by julchin_09: Jun 23 2010, 12:41 AM
Eugene91
post Jun 23 2010, 09:44 AM

Look at all my stars!!
*******
Senior Member
6,109 posts

Joined: Dec 2008
From: Mike India Romeo India


Hey guys see this M11x R2 Core i7-640UM OCed with Turbo Boost and Without for GTA4 Benchmark

http://forum.notebookreview.com/alienware-...-may-think.html

Unbelievable without Turbo boost its like 2 times for FPS gain!

So i guess buying the M11x with Core i3-330UM and OC it is as good as the Core i7-640UM(Turbo Boost Turned Off)
SUSwilsonjay
post Jun 23 2010, 09:58 AM

6 Stars Social Justice Warrior
******
Senior Member
1,605 posts

Joined: Feb 2006


wow so i3 = i7 without TurboBoost?
Eugene91
post Jun 23 2010, 10:20 AM

Look at all my stars!!
*******
Senior Member
6,109 posts

Joined: Dec 2008
From: Mike India Romeo India


QUOTE(wilsonjay @ Jun 23 2010, 09:58 AM)
wow so i3 = i7 without TurboBoost?
*
yeah but less 1MB L2 Cache smile.gif
emino
post Jun 23 2010, 10:52 AM

IG - riezforester
*******
Senior Member
5,967 posts

Joined: Oct 2004
From: Malaysia... Duh!


QUOTE(Eugene91 @ Jun 23 2010, 09:44 AM)
Hey guys see this M11x R2 Core i7-640UM OCed with Turbo Boost and Without for GTA4 Benchmark

http://forum.notebookreview.com/alienware-...-may-think.html

Unbelievable without Turbo boost its like 2 times for FPS gain!

So i guess buying the M11x with Core i3-330UM and OC it is as good as the Core i7-640UM(Turbo Boost Turned Off)
*
From the thread this theory only applies to GTA4. Most of them agrees that Turbo Boost On is the way to go for most games, but people should really turn it off once in a while when playing games just to know for sure.

I think the theory is just that some games works great on dynamic core, some on static.
Eugene91
post Jun 23 2010, 10:54 AM

Look at all my stars!!
*******
Senior Member
6,109 posts

Joined: Dec 2008
From: Mike India Romeo India


Well GTA4 is known as a bad port.. So im hoping they try it with BF:BC2 or any recent games biggrin.gif
f4natic
post Jun 23 2010, 11:59 AM

Getting Started
**
Junior Member
122 posts

Joined: Aug 2008
well for su7300 OC to 1.7, it sux when playing settlers 7 too laggy
Eugene91
post Jun 23 2010, 01:05 PM

Look at all my stars!!
*******
Senior Member
6,109 posts

Joined: Dec 2008
From: Mike India Romeo India


Another benchie for Batman.. no real difference comparing turbo boost and turbo boost off according to the poster .
acidkill
post Jun 23 2010, 03:35 PM

OMG
*****
Senior Member
938 posts

Joined: Jan 2003
From: Kajang/Bangi


Here comes my vantage benchmark. smile.gif
No OC. tongue.gif

user posted image
julchin_09
post Jun 23 2010, 06:14 PM

"Complicated Nutter"
*******
Senior Member
7,485 posts

Joined: Jun 2005
From: Kuala Lumpur


QUOTE(Eugene91 @ Jun 23 2010, 10:20 AM)
yeah but less 1MB L2 Cache smile.gif
*
M11x = Cili Padi. Small but packs a punch. U guys gotta try BF2BC2 and let us know. I'm trying to get a friend of mine to get the M11x-R2 but he wanna know the performance first....

QUOTE(acidkill @ Jun 23 2010, 03:35 PM)
Here comes my vantage benchmark.  smile.gif
No OC.  tongue.gif

user posted image
*
Nice one bro. smile.gif Post in the benchmark thread ur scores over at MOBILE COMPUTING smile.gif
Eugene91
post Jun 23 2010, 06:23 PM

Look at all my stars!!
*******
Senior Member
6,109 posts

Joined: Dec 2008
From: Mike India Romeo India


Maybe can wait on the upcoming AMD Vision platform M11x R3 tongue.gif - Wishlist haha


AMD Turion II Neo x2 K665@1.7GHz 15W TDP
ATi Mobility Radeon HD5650/HD5730

biggrin.gif biggrin.gif

This post has been edited by Eugene91: Jun 23 2010, 06:23 PM
raven143
post Jun 23 2010, 08:06 PM

Casual
***
Junior Member
312 posts

Joined: Apr 2006


any1 tried this driver yet?
http://www.nvidia.com/object/notebook-win7...hql-driver.html

didnt spot the update from official dell though..
Lil Kiasu
post Jun 23 2010, 08:15 PM

Ok
*****
Senior Member
723 posts

Joined: Apr 2010
From: PJ


QUOTE(Eugene91 @ Jun 23 2010, 06:23 PM)
Maybe can wait on the upcoming AMD Vision platform M11x R3 tongue.gif - Wishlist haha
AMD Turion II Neo x2 K665@1.7GHz 15W TDP
ATi Mobility Radeon HD5650/HD5730

biggrin.gif biggrin.gif
*
good news if got like that... coz bored with Intel and NV edi~ tongue.gif rclxms.gif


Added on June 23, 2010, 8:40 pmuser posted image

user posted image

user posted image

user posted image

user posted image

This post has been edited by Lil Kiasu: Jun 23 2010, 08:42 PM
peas6590
post Jun 23 2010, 08:59 PM

Getting Started
**
Junior Member
261 posts

Joined: Nov 2008
QUOTE(Lil Kiasu @ Jun 23 2010, 08:15 PM)
good news if got like that... coz bored with Intel and NV edi~ tongue.gif rclxms.gif
» Click to show Spoiler - click again to hide... «
our aero rating is almost same rclxms.gif ouh,. our m15x setup is same.. but i wonder why my cpu clock multiplier is x7 at idle.. isit tweaked or what?

128 Pages « < 35 36 37 38 39 > » Top
Topic ClosedOptions
 

Change to:
| Lo-Fi Version
0.0419sec    0.17    6 queries    GZIP Disabled
Time is now: 3rd December 2025 - 06:08 AM