

 Mar 21 2005, 06:54 AM, updated 21y ago
by Paula Begoun
Before you Start
1)Always apply makeup to clean skin (follow the routine appropriate for your skin type).
2)Make sure you have all the appropriate makeup tools and products you need.
3)Apply makeup in a well-lighted area.
4)Use a magnifying mirror to check your blending and overall smoothness.
Step 1: Foundation
Select a foundation for your skin type that matches your underlying skin tone exactly. Using the flat, smooth surface of a round, nonporous synthetic sponge, pour some foundation onto the sponge, then transfer the foundation in dots and dabs all over the face and the eyelids. You can also use your fingers to transfer the foundation in dots from the bottle to the face. Use your sponge to blend the foundation down and out over the face. Use the edge of the sponge without foundation (or turn the sponge over to the clean side) to dab or buff away any excess product. Do not apply foundation on the neck or under the chin. Your sponge is an exceptional blending tool that can be utilized throughout the makeup application process.
Note: If you are relying on a foundation with sunscreen for sun protection, you must apply a complete, even layer over the entire face. A thin or too sheer application will not provide adequate protection from the sun.
Step 2: Concealer
Use a concealer that is one or two shades lighter than your foundation. Apply it in a small arc around the inside corner of the eye. Using your fingers or a concealer brush, blend the concealer out evenly by dabbing and buffing. Avoid pulling or tugging the skin under the eye. Be careful not to spread the concealer onto areas where you don't want it. You can also apply concealer to the eyelid if that area is dark or, if your concealer has a matte finish, as a way to help eyeshadow cling better. For concealing facial discolorations such as freckles, blemishes, or red spots, use a concealer that matches or is just slightly lighter than your natural skin tone.
Note: Overly emollient or greasy moisturizers can make concealer slip into the lines around the eyes.
Step 3: Powder
After you apply the foundation and concealer, dust a light layer of powder over the entire face and eyelids. Apply the powder with a large, full, round brush. Avoid using a sponge or powder puff, which can put too much powder onto the face. Pick up some of the powder on the full end of the brush, knock off the excess, and brush it on using the same motion and direction as you did for the foundation (down and out).
Powder is great for touch-ups as the day goes by to dust down excessive shine.
Powder with sunscreen must be applied liberally so a thorough application is necessary for adequate protection. It is best to use a powder with sunscreen in combination with a foundation and/or moisturizer that also offers sun protection.
Step 4: Eyeshadow
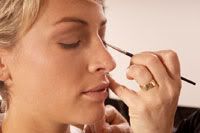
All of the options for building an eye design are too numerous to list here. The following is a basic application that can be adapted to create a variety of looks:
Typically, the lightest color is applied to the entire eyelid and to the edge of the eyebrow. (The general rule is that the larger or more prominent the eyelid area is compared with the under-brow area, the darker or deeper the eyelid color can be; the smaller the eyelid area is compared with the under-brow area, the brighter or lighter the eyelid color can be.) Select a deeper color from the same or a complementary color family to shade the crease. Practice your application and blend well; the goal is not to have obvious edges of color. Remember, lighter colors bring things forward and highlight, dark colors recede and add depth and shading.
Step 5: Eyeliner
Position the brush, pencil, or applicator as close to the lashline along the eyelid as possible. Then draw a line from the inner to outer corner using one fluid stroke, following the curvature of the eyelid. As a general rule, do not extend the line past the outer corner of the eye or hug the tear duct area of the eye. At first, keep the line as thin as possible, and if a thicker line is desired, repeat the process either across the entire lash line or simply on the outer third of the lid along the lashes.
Generally, the line along the lower lashes should be thinner and a less-intense color than the upper liner. Make sure that the two lines meet at the back corner of the eye. As a general rule, the larger the eyelid area, the thicker and softer the eyeliner should be. The smaller the eyelid area, the thinner and more intense the liner should be.
For health reasons, avoid lining the rim of the eye.
Step 6: Eyebrow Shaping
Use a color that closely matches the color of your brows rather than your hair color or a color you think would look better than what already exists. Apply powder brow color using a wedge brush, working in the direction the hair grows. Use a light touch, with short, quick motions, and avoid the temptation to exaggerate the shape of the brow by arching it severely or extending the brow into the temple area.
Step 7: Mascara
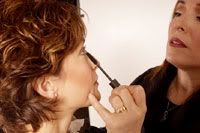
If you use a lash curler, it is best to use it before you apply mascara. Squeeze gently with even pressure. Hold for a few seconds as you "walk" the curler along the length of the eyelashes, and release slowly. Apply mascara to the upper lashes using long, sweeping strokes. Be sure to begin as close to the lash root as possible and brush up and out. Use an old, cleaned-up mascara wand to remove any clumping that occurs.
Apply mascara to the lower lashes by holding the wand perpendicular to the eye and parallel to the lashes (using the tip of the wand). If necessary, use a tissue to wipe excess mascara off the brush before applying to the lower lashes.
Step 8: Blush
Using a blush brush, apply blush along the full line of the cheekbone brushing down and back toward the ear. Always knock the excess powder out of the brush to avoid applying too much blush. Use your sponge to soften any hard edges. Do not apply blush to the temple area, chin, nose, or forehead--this tends to make skin look uneven and ruddy.
Step 9: Lipstick and Lip Liner

A lip brush or lip pencil is an optional accessory. You can use a lip pencil to draw a definitive edge around the mouth to follow when applying lipstick, and a lip brush to control your application. A standard tube of lipstick makes too wide a mark for some lips and too narrow a mark for others. If your lips are small, it is best to use a lip brush; if your lips are large, the only reason to use a lip brush is to improve your accuracy, especially with deeper shades such as red.
Line the actual shape of your mouth. Do not use corrective techniques that make the mouth look larger or longer, especially for daytime makeup--it almost always looks like a mistake.
If you want your lipstick to last, apply more of it and don't blot; blotting takes off several layers before you've even left the house.
Important Reminder:
Good brushes are essential for applying makeup:
1)Use soft, pliable brushes. Avoid hard or stiff brushes.
2)Use a brush that is the correct size for the area of the face you are working on.
3)Avoid brushes that are too large or too small.
4)Remember to knock the excess powder off the brush before you apply the color to your face.
5)Brush on the color gently with short even strokes; avoid wiping or rubbing the brush across the face.
6)Gently wash your brushes every month or so.
source MUP
 Quote
Quote


 just kill me..


 0.0244sec
 0.58
0.58
 6 queries
 GZIP Disabled